The article was written by Vic McLeod, who knew a little something about cartoons. He was the head writer for Walter Lantz at the time.
McLeod’s stay in animation was reasonably short. He was born Victor Ian McLeod in Nampa, Idaho on August 2, 1903 to John Archie and Myrtle Smith McLeod. His father was a barber, originally from Canada. McLeod was apparently a magazine writer before he landed at Lantz. His first cartoon writing credit was in 1934 (among other things, he wrote the lyrics to “Dunk, Dunk, Dunk,” sung by the squealing Berneice Hansell in the colour short Jolly Little Elves) and his last was in 1939. McLeod moved over to the main lot at Universal where, among other things, he wrote a musical Western for Johnny Mack Brown and the Gang Busters serial.
Radio looked like a better career for McLeod, who was soon writing for Bing Crosby, Edgar Bergen, Dennis Day and Bob Burns. When network television started to bloom in the late ‘40s, McLeod moved to NBC in New York with producer Norm Blackburn. This was the same Blackburn who animated for Hugh Harman and Rudy Ising going back into the 1920s. The two of them (according to Variety, Nov. 5, 1964) had a stage act years earlier, dubbing themselves the Beach Boys. McLeod produced Broadway Open House, the forerunner to the Tonight show, and programmes for Arthur Murray, Robert Ripley and Chevrolet. He headed back to the West Coast where he continued to write and produce; Circus Boy was one of his shows. He was still writing in 1968; he sold a rock-and-roll drama story to Four Leaf Productions. McLeod died in Hollywood on December 12, 1972.
Oddly, for a story man, McLeod doesn’t touch on the story process of making a cartoon. There’s nothing about sound. He talks about drawing and shooting, and a bit on timing; the story seems aimed at amateur filmmakers who wanted to make an animated title sequence. Still, it’s a good insight on how cartoons were made at the Universal studio.
Adapting animation
VICTOR McLEOD
THE creation of a present day animated cartoon is a complicated and tedious process requiring highly skilled work. Some idea of the labor required in producing one of these amusing novelties is realized when it is learned that it takes the combined effort of over a hundred people — writers, artists, assistant artists and technicians — to produce, in three weeks' time, a cartoon of approximately eight hundred feet. These pictures require drawing, inking, painting and photographing between twelve and fifteen thousand drawings.
It is practically impossible for any person to produce successfully a cartoon without a complete and competent staff. There are several novel and entertaining effects, however, that can be animated and produced by the amateur movie maker with a minimum of effort. These can be used to advantage in the production of novelty titles and graphs and in the illustration of points in an industrial reel.
Sketching in titles and drawing pictures under the camera are a novelty to most audiences, and they can be used in many productions. This effect is quite simple and it does not require a great deal of time. The motion picture camera must be equipped with a stop motion device that will enable you to shoot one picture at a time. It must be mounted on a camera stand so that it may be focused on a flat, horizontal camera field. If the stand can be made so that it is possible to truck up and down with the camera, it will be very advantageous for some shots. This is not absolutely essential, however.
Sketch the title lightly with blue pencil on the drawing surface that is used for the background. Over a section of this pattern, draw, with a black pencil, a heavy line from a quarter of an inch to an inch in length. The exact length of this black line will vary according to the speed with which you wish the title to appear. Leave the pencil point at the terminus of the segment of the heavy line and take one exposure. Repeat until the sketch is completed. This can be done equally well with a pen, crayon or brush. The same process is used in drawing a picture. The outline can later be shaded and filled in with a pencil or brush by using, with each exposure, full length shaded strokes of about a quarter of an inch in width.
Another novel effect is writing a title with a pen that seemingly rises unaided from a bottle of ink and, without human aid, proceeds to write or draw upon the drawing surface background. The simplest way to achieve this effect is to secure separate pictures of an ink bottle and a pen. Mount the pictures on heavy cardboard and make cutouts of them. The ink bottle is placed and securely fastened to one side of the drawing paper, but well in the camera field, so that, when a photograph of it is taken, it appears on a background made to look exactly like a drawing easel with the ink bottle resting on the ledge at the bottom of the board. A slit is cut in the top of the ink bottle so that the cutout of the pen can be inserted under the cutout of the ink bottle, causing an effect of the pen being in the bottle.
The pen now is slowly raised from the bottle in half inch moves and one frame is exposed in each position. Continue the motion until the pen has reached the proper position on your drawing board.
The backgrounds can then be changed to eliminate the ink bottle from the picture. This can be done by using a larger pen cutout and a new, plain white background to give the effect of a closer shot or, if your camera stand is movable, this can be accomplished by trucking down to a closer field. A gray shadow cutout of the pen will give the illusion of the pen being in the air; this shadow is moved to a corresponding position with each move of the pen.
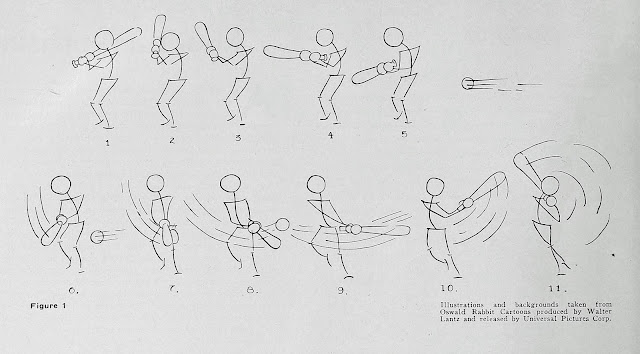
Drawing "line daffodils," such as those in Figure 1, is a good approach for a beginner who wishes to learn the fundamental rules of animation. Action of this sort is quite easy to draw and will help to familiarize the animator with movement and timing. The illustrations show the proper action used as a batter swings and connects with a ball. Animation of this kind is the fastest and easiest to do, because it requires inking the drawing again or "opaqueing" it. Each drawing is done on a separate sheet of paper and is photographed separately and in sequence, the white paper acting as the background.
All studios use this method of making tests to photograph the rough action of their characters before going ahead with transferring the drawings to the transparent celluloids. It might be likened to a rehearsal to see if the action is smooth and the timing is correct.
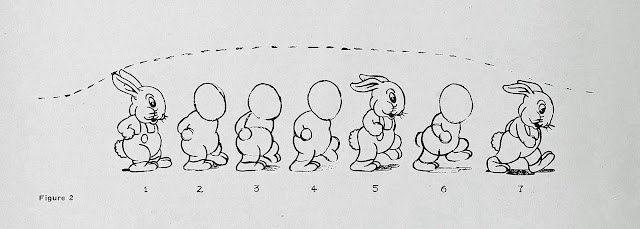
Figure 2 shows a walk of Oswald Rabbit, the new Walter Lantz character for Universal cartoons. Drawings one, five and seven are the extremes. The rough drawings are the "in-b-tweens." The foot is brought up slowly to position five and then down fast to complete the step. This technique is what is meant by timing. There is no set rule for timing animation. Try to have the characters give the illusion of natural action as closely as possible. This can be accomplished only by practice and application. The rough drawings are "cleaned up" after the tests are shot so that they are like the extremes. Notice that the size of head and size of body remain the same; therefore a standard circle can be used and traced each time instead of being drawn free hand. This eliminates any fluctuation in the size of the character and also eliminates a great deal of work. The expression on the face in this sequence remains the same throughout, so again a lot of work is saved merely by tracing the head of the master drawing for each of the following drawings. The character, of course, must be animated along the line of action or it will be too stiff. The dotted line indicates the flow of action. This natural flow of action is a set rule that must be adhered to, if the proper result in animation is to be obtained. Keep in mind the movement of a fish swimming in water or the action of a streamer being pulled through the air. The body always follows in a graceful sweep through the same imaginary path set by the head.
The illustration shows one step of action. The same procedure must be followed with the other foot to get the complete sequence for a walk. By practice, variations of this action can be made into a run of any speed desired. This action can be used for a walk across the camera field or for a walk when the character stays in one place and the background moves behind it. This moving background is a great labor saver and is very essential if much animation is to be produced. The principle may be used in the simplest type of work.
In order to use the moving background, the outline of the action of the characters must be traced in India ink on transparent celluloid sheets, or "cells." This outline is then filled in with opaque water color paint. Different tones and shades, ranging from gray to deep black, are used for filling in. Foto-film color is the best for this purpose.
The celluloid and drawing paper sheets are all punched with two corresponding holes about three inches apart and a half inch from the top edge. These are known as peg holes and they fit snugly over pegs at the top of the drawing board and at the top of the camera field, out of the picture. This insures a perfect register of all tracings and keeps each movement of animation in register with the preceding movement.
The moving background or "sliding pan" is usually from three to six camera fields in length. It must be fastened to the camera stand so that it will move freely to the right or left but so that it will not fluctuate up and down. It can be placed on sliding pegs that are fastened to a sliding panel or it can be taped securely to the panel. Along the panel, there must be some kind of a scale with calibrations marked off in sixteenths of an inch. A flat steel rule securely screwed down will answer the purpose very nicely.
If the peg holes in the paper and "cells" are at the top, then the sliding panel and scale work from the opposite side or on the edge of the camera stand closest to the cameraman. The top edge of the "sliding pan" slides against the top pegs, the ones upon which the celluloid action sheets are fitted.
In animating a character of Oswald walking along a road, we would use a road panorama background, four fields in length, and a complete sequence of a walk, which is fourteen drawings.
These fourteen drawings are all painted in the center of separate and respective "cells," each registered in sequence to the preceding one. There are now fourteen "cells," each with a character in the same position on each "cell," but each succeeding "cell" has a different form of the character. When photographed in sequence one after the other, the result will give the movement of the character walking in one spot. However, when the background is moved in the opposite direction the character appears to be walking forward. Repeat this sequence as often as is necessary to get the character into the next scene or to the desired place on the background.
"Cell" number one is placed over the background with the character at the left end of the background and facing to the right. A picture is taken and the background is moved a sixteenth of an inch to the left with each succeeding change of the "cells." This gives the impression that the character is walking to the right. It is practically the same system as the treadmill with the rotating backdrop that was used in the days of the old melodrama, when the "heavy" chased the heroine across the meadow or down the lane.
With this system, the fourteen "cells" can be used in sequence with many different changes of background. Speed may be obtained by moving the background in longer movements and by lengthening the stride of the character.
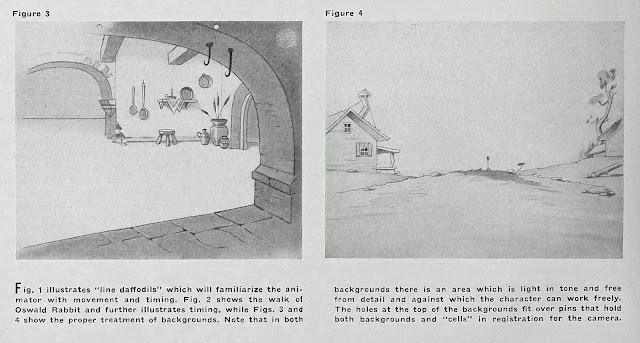
Figures 3 and 4 on page 12 give an idea of the proper construction of your backgrounds. The spot where the character works must, at all times, be kept very much lighter in tone or color so that it will not conflict with the action and so that none of the action will be lost by blending into the background.
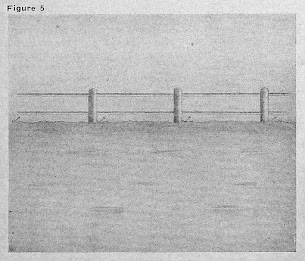
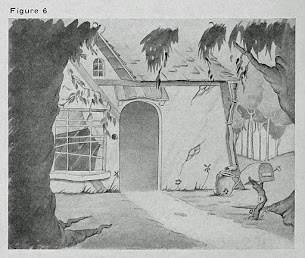
A simple pencil background, such as Figure 5 on page 13, can be made easily by anybody with artistic ability. This can be lengthened into a four field panorama if desired. A water color wash background (Figure 6 on page 14) is a bit more difficult to make. However, any artist can make backgrounds such as this at a reasonable cost, and it will add a lot to the appearance of the animation.
Enlargements of regular photographic negatives can also be used as backgrounds. Novel "gags" can be produced by enlarging frames from regular motion picture film and using these as backgrounds for animated characters. Cut the animated sequence back into the picture and the characters will appear to be photographed with the rest of the reel.
Extra "cells" or "X cells" are great labor savers in making animated cartoons. The illustration (Figures 7, 8 and 9 on page 14) of "Elmer The Great Dane," taken from the Walter Lantz cartoon, Monkey Wretches, shows what is meant by this process. The run of the dog is animated on one set of "cells." The monkey is animated on another set of "cells" and matched to appear to be perched astride the back of the dog. In this manner, the run of the dog can be used again in some other sequence, where the monkey is not required.
This method can also be used when a character moves his arms or legs while the rest of the body is held. The body of the character is held on one "cell" and the animated part put on a series of "X cells," so that the entire character does not have to be painted and inked more than once. Care must be taken, however, to have the "X cells" matched perfectly at the point of contact between the animated parts and the "held" drawing.
A third dimension effect can be obtained by the use of a sliding overlay celluloid on all "pan" shots. This is a transparent "cell" with a border of trees, cattails, flowers or foreground sets, such as steeples, poles, etc., that occasionally move across the scene and in front of the action. It is used over the top of the entire sequence. It is moved at the same rate of speed as your regular "sliding pan" background. The design on it is painted very dark gray or solid black so that it appears to be directly in front of the camera lens.


No comments:
Post a Comment