It would appear this kind of thing was in Lantz’s blood. He and his staff appeared on a newsreel in 1936 demonstrating how an Oswald the Rabbit short was put together. Either that was extracted for home movie release, or he made a separate 16 mm. film, though I suspect it is the former judging by the sketch of Oswald and the turtle in a baseball game.
That film was the subject of the article below in the July 1939 edition of Home Movie magazine.
Lantz Movie Explains How To Animate
Authored by Curtis Randall
J.C. Milligan photos
Substantiating many of the things Walter Lantz described in his recent articles in HOME MOVIES on Animated Cartoons, is a 400 foot 16mm sound film recently made by him.
While this reel does not go into the subject as completely as did the articles, nevertheless it clarifies all of the important phases of animated cartooning Lantz dwelt upon in his interesting articles. In this film, he not only appears several times personally explaining a certain situation or technique, but the various important steps in the making of an animated cartoon are worked out before your very eyes. Here, in 400 feet of motion picture film, you see and hear what goes on behind the gates of the Walter Lantz studios. You are taken right inside the studio, as a personal guest of Mr. Lantz.
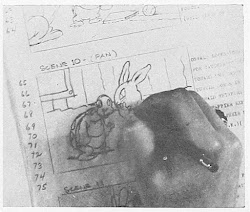 The opening scenes show Lantz pondering an idea for a new’ cartoon subject. As the idea develops, Lantz makes rough sketches and writes a brief outline of the action. Next, we see him take his idea — sketches and all — to one of his chief animators. He explains the idea and tells the animator just the kind of action he wants, emphasizing in terms of fractions of an inch, just how far one of the cartoon subjects should move within a given time to produce the desired effect.
The animator takes the idea and works up the cast of characters. It is he who conceives their costumes, mannerisms, and style of speech. He makes the initial sketches of each sequence on a shooting script, which differs greatly from the scripts used in regular motion picture productions. Adjacent to the sketch is a brief synopsis of the action for that particular scene or sequence. The animator calculates the number of separate frames of film that will have to be photographed for the given action, and this number is noted immediately beneath the sketch on the script page.
To the layman, the process of determining the exact number of separate shots that will have to be made to secure a given action would seem difficult. But the animators have this worked down to a fine science and know just how many eighths or quarters of an inch the subject should move per second to gain the required results, which Lantz clearly show’s in his film.
After the chief animator has completed all initial sketches and his shooting script, the script is broken up into sections and divided among the staff of artists, who immediately set to work drawing the necessary backgrounds and the thousands of characters necessary to making the full length film.
You will see the artists drawing the cartoon characters on clear sheets of celluloid which they term “cells.” A separate cell has to be made for each of the predetermined steps in the action as estimated by the chief animator and explained above. After these cells are completed with sketches of the characters outlined in ink, they are sent to another staff of artists who apply the colors. Still another staff of artists make the backgrounds and these are drawn on long sheets of paper, so that they may be moved horizontally in back of the cells as they are photographed, to add to the illusion of motion in the characters.
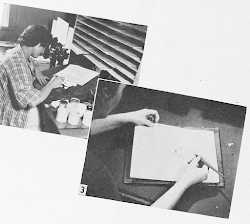 After all of the cells and backgrounds are completed, they are sent to the camera department, and here you see huge stacks of cells with their corresponding shooting scripts being studied and executed by the cameraman. The camera is of special construction with a “single frame” or “stop motion” mechanism tripped by a foot pedal, the pressing of which operates the mechanism and assures smooth action and even exposure.
After all of the cells have been photographed and a print of the film has been obtained and subjected to the initial cutting, another staff prepares to score in the dialogue and sound effects. You will see the film being projected a number of times, as the sound department rehearses and revamps the dialogue. Members of the sound staff are shown testing various sound and noise makers for just the desired effect called for in the picture. You see, in making an animated cartoon, the picture is made first and the dialogue and sound is dubbed in afterward.
When the sound director o.k’s the dialogue and sound effects and these have been so timed that they fit the action perfectly, the sound score is made. In this film you are taken right into the sound department projection room. The film is projected on a screen. Musicians, dialogue artists, and sound effect men stand before microphones — much the same as in a radio broadcast — and, at the right moment, they “do their stuff” so to speak, producing the sounds and speech required.
There is much to be gained regarding the modern technique of animated cartoon production in viewing this film, and amateurs who are interested in this phase of cinephotography should make it a point to see it. This film is available from the film rental libraries of the Bell & Howell Company, and is a worthy subject for screening at any club meeting.
The April 1939 edition of the magazine has an illustrated article by Lantz on filming cartoons. Here it is.
Equipment used in Animation Work
The first step in “shooting” animated cartoons is the taking of a few frames of the “slate.” This is, as the name implies, an old fashioned school slate upon which is chalked the information needed later for the cutting and editing of the finished cartoon. It is placed under the camera at the start of each scene. If the scene is taken more than once, it is given a “take” number. A properly filled out “slate” is shown in Fig. 1, the data on which is constantly being changed for each take, scene, etc.
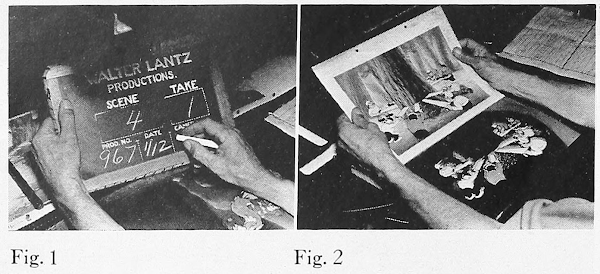
Next, the cameraman places his “continuity guide” next to him, as shown in upper right hand corner of Fig. 2. This guide shows the cameraman the number of exposures in the next scene and the number of times each exposure is taken. For example, he is starting a scene and is getting ready to shoot cell No. 1, of scene No. 1, which requires three shots or “takes” for this particular cell. All of this data is contained on the “slate.” When this has been done, he moves to Cell No. 2 and so on, placing a pin marker on the next line below.
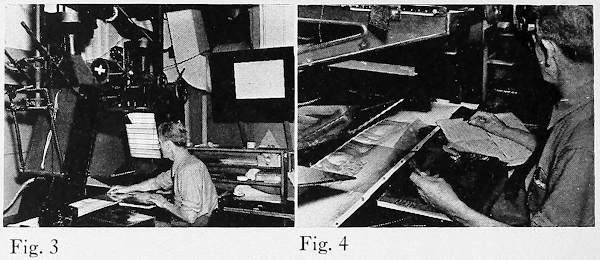
The cameraman is starting a scene, in Fig. 3, and has all the cells neatly stacked before him, in numerical order. As he shoots one he lays aside the previous cell and moves up a number on his sheet, using a pin-marker, to prevent error, as shown in Fig. 4.
Next, we come to Fig. 5 which shows the left hand of the cameraman holding a “cell” which is ruled off in various sizes of rectangles, each rectangle having a number. This cell is called “field guide” and as it is placed over the picture, shows the area capable of being taken at a given distance, from the camera. From the past experience you know that the farther away the subject, the smaller it becomes (unless you change lenses). In cartoon work, to get close-ups, the camera is moved down, closer to the drawing. This is called “trucking”; the lens being re-focussed, for distance, as the “trucking” continues. The theory involved is much the same as “zooming,” with which you are all familiar.
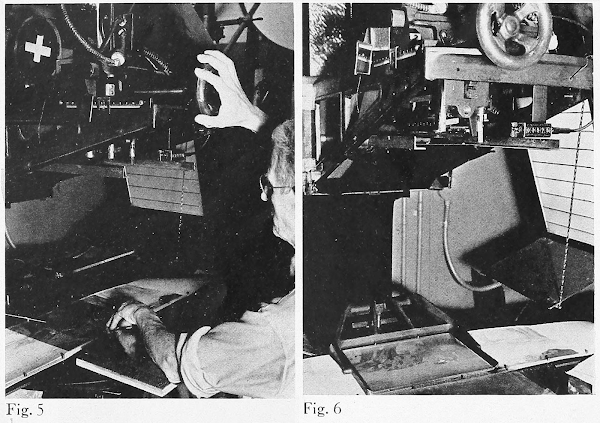
Upon closely examining Figs. 5 and 6 you will notice that the camera structure has accurately calibrated scales, as fine as l/32nd of an inch in controlled movement. Further, the calibrated, controlled movement is not limited to an up or down position but in various other planes as well ; such as forward, backward, right or left, across the picture area. This provides a fully universal control of movement, in any plane.
In Fig. 5 and also in Fig. 6 there is a scale in the upper part of the picture close to the left. This is a flat scale and is used for moving camera forward or backward. Underneath this and slightly to the front is a cylindrical movement of camera when “trucking.” Note also, in Fig. 6 a “counter” mechanism, registering the number of frames taken. The “lattice effect” boxes (prominent in Fig. 3) and on each side of the structure, are specially-designed mercury lights.
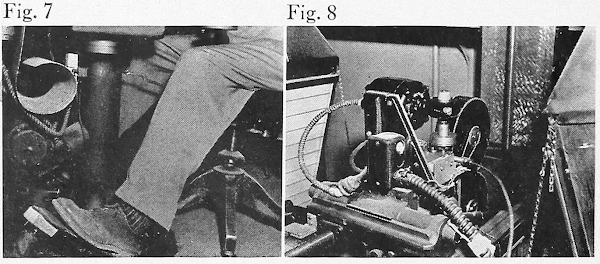
The ‘single-frame” or “stop-motion” mechanism is tripped by a foot pedal, as in Fig. 7, the pressing of which operates a solenoid (or magnet) which takes one picture for each time the foot pedal is pressed. Fig. 8 shows the camera motor unit, solenoid (or magnet) and other of the rather complex mechanisms required in this work.
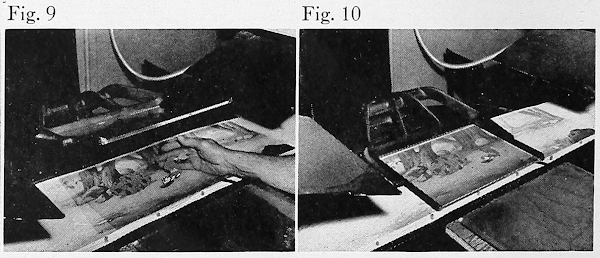
Figs. 9 and 10 show the glass-press arrangement which holds the cells flat, while shooting. This is heavy plate glass, in a frame and is operated by foot pressure.
Notice particularly, in Figs. 9 and 10, the “background” being quite a bit longer than the cell. This background can be moved sideways in the slots, while the cell is held stationary ; causing the illusion of the characters moving and saves innumerable drawings. This arrangement is also accurately calibrated for movement, which must be synchronized with the action movement of the characters. Note also that the table on which this mechanism is built is round and capable of being rotated.
“Animated cartoons” are a highly specialized branch of studio technique, requiring, as you can now understand, complex mechanisms, a high degree of systematized skill and lots of patience, assuming that a two-reel cartoon has 2,000 feet of film, each foot of which has 16 frames or pictures, it would require 32,000 drawings (many of which have several characters on them) and each successive drawing must show a slight advance in animation to produce the illusion of motion.
The sound effects, dialog, etc., are “dubbed in” later; after the cartoon is finished, it is run in the projection room and a sound-track made of all noises while the picture is being shown on the screen. This separate soundtrack (on separate film) is superimposed on the cartoon.
It’d be kind of cool to see Woody Woodpecker (or even Oswald) come in with some comments, just like the ‘50s/’60s TV half-hour. I don’t know if the camera story was of any help to an amateur wanting to make a cartoon, but it at least gave the Lantz studio a bit of publicity.

A short film was in theaters around this time about how cartoons were made at the Lantz studio, available on the Woody Woodpecker & Friends DVD. I wish I could identify the animator in it.
ReplyDeleteIf I had that talent, I'd be inclined to show it off myself.
ReplyDelete